Arduino controlled lights – The Hardware

Okay – now that I have a box it is time to wire it all up.

After playing around with various methods of switching I settled on a bunch of solid-state relays connected to the arduino.

The advantage of solid-state relays over mechanical onese are that they switched quicker, are less likely to arc and don’t require any additional components to up the voltage in order to throw them.  I ended up with a bunch of FSS1-102Z relays which can be bought from jaycar for about $12 each as part SY4088.

These relays can switch 250VAC happily with only a 5V switch current.  This means I could wire them straight to the arduino.

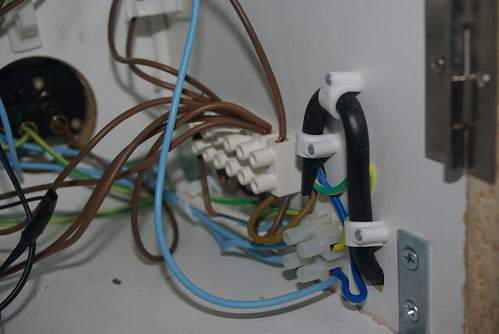
Power comes into the box from the side goes to two distribution blocks.

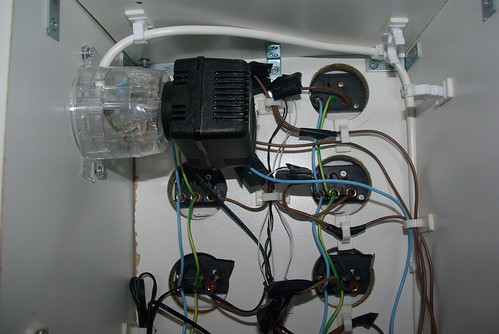
One block splits the earth (green) and neutral (blue) lines into three sets with one set going to the internal powerpoint (used to power the arduino plugpack) and the other two sets going up the left and right columns of power points.  Each powerpoint is linked to the one above it which helped to keep the wiring minimal and tidy.

The other, much larger, block provides a bunch of points for connecting the live (brown) wires.  From here power is sent to the internal powerpoint and one live wire to each row of powerpoints.

The live wires go up to each row and are split in two at the
last moment to each connect to one point on the load side of a relay. 
The other point on the load side of the relay connects to the live plug
on the powerpoint.

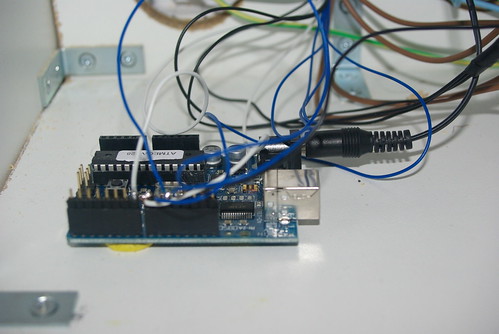
On the input side of the relays the negatives are all linked together and head down to ground on the arduino.

The positives are kept separate and go down to the digital outputs on the arduino.

To make things a bit easier for testing I soldered each of the incoming lines to a row of pin headers.  This means I can quickly unplug/plug in the lines to the arduino in case I need to use it elsewhere.  It also helps to keep them in order 🙂

Because this box is running 240V I added a small 240v light to the top of the box that is lit up whenever the box has power (even if the arduino is not running)  This just serves as a little warning.

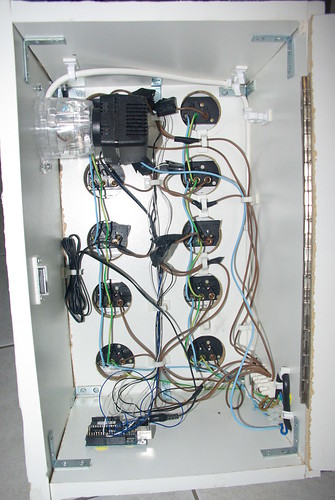
The final result is seen below

Next up – the software!

Arduino controlled lights – The Box

The aim was to start with 10 outlets and build out from there.

To make things easier I decided to make a box with room for 10 standard 240V wall powerpoints.

Each powerpoint is 117x70mm so allowing for two columns of five points (with space between each to allow for plugpacks)I ended up with a base of 250x460mm.  I ended up making the box 220mm deep so that it wouldn’t fall over (the exact dimension was mostly determined by the size of the piece of wood I had)

In the end I needed the following cuts:

  • 2 * 250×460 for front/back
  • 2 * 220×460 for sides
  • 2 * 250×210 for top/bottom

I cut the sides out of a sheet of melamine MDF and assembled by connecting with small right-angle brackets.  I then finished it up by applying some melamine lining to the exposed wood for aestetics.  The back panel was attached by a large hinge and a small handle was added.

Here is the final result:

Arduino controlled lights

Last Christmas was my first Christmas in my very own house (was renting before) and so I was able to put up more lights than before.  In the process of setting up the lights I thought about making them computer controlled (so as to sync to music etc)

I had some X10 appliance modules which did the job for turning them on/off at the right times of day, but there was so much lag that I couldn’t use it for anything fancy.  As such I started looking around for how to do this properly.  Most of the stuff I found was only available in the US and/or was very expensive so I figured I’d just do it myself 🙂

To that end for Christmas my wife bought me an Arduino and various little bits.  I then spent a while learning how to program it.  Then after a bit more time I began work on an arduino controlled power box.  At long last I have finished it (hardware-wise – better software is still to come)

So that others may get some benefit from my testing I figured I’d blog how I made it. I’ll split the build up into a few posts for easier digestion – The box, the hardware and finally the software.

Here goes nothing.

Console-based podcatcher

A few days ago I installed a new disk in my laptop to replace the existing small one. Being the careful person I am I backed up the important data and then migrated the contents from the old disk to the new one via rsync.  Everything worked well and I was able to boot into the new disk right away without issue.  That is until I went to update the podcasts I listen to.

I had forgotten that I keep my podcasts (and the script I used to grab them) on a ZFS partition that I accessed via zfs-fuse (since I access it from linux)  Being the careful person I am I had forgotten to backup that partition 🙁

As such I was faced with re-constructing the script from memory or rewriting from scratch – I chose option 2.

I remember a while back finding a simple bash-based podcatcher called BashPodder that I figured would be a good base. But the problem was that BashPodder is designed for running from a cronjob on a daily basis and offers no real display of status, no parallelism etc but it did know how to parse a rss feed and that is what I most wanted.

I took that script and then re-designed it for usage as a console application.  It now will fork a sub-process for each feed and download all the feeds in parallel while providing a status screen showing how much is download, the percent finished, the download rate, the estimated download time remaining and the filename for each feed.

Here is a sample output:

    Down|Perc| Rate| Remain|Filename
-----------------------------------------------------------------
195600K| 70%| 110K| 23m12s|tekzilla--0080--itunes--large.xvid.avi
154550K| 33%| 254K|  1h48m|diggnation--0194--SXSW2009--large.xvid.avi
188050K| 34%| 165K|  1h41m|trs--0104--2years--large.xvid.avi
163100K| 77%| 167K| 15m32s|scamschool--0053--strapped--large.xvid.avi
150700K| 66%| 113K|  27m6s|systm--0095--benchmark--large.xvid.avi

Since I don’t run this from a cronjob and I can’t guarantee all the downloads will finish before I have to go offline it also allows you to press ‘q’ to quit – at which time it tells each sub-process (via a control file) to stop downloading.  When you next run the script it will continue the download from wherever they were up to.  As such I no longer download the podcasts into a different directory each day – rather they all end up in a common directory to allow continuing downloads the next day.

Thanks to another control-file – which contains a count of the number of active downloads – the script doesn’t exit until all the sub-processes are done or have exited.  This control file sits in ~/.bashpodder_logs (which also contains the wget logs for active downloads and the list of files already downloaded)

The script reads from a file called ‘.bashpodder’ in your home directory containing the URL of each feed (comments are allowed) and logs which files have been downloaded to a seperate logfile for each feed (based on a md5 hash of the feedurl – saves having to parse the url to make it filename safe) so as to not re-download them later

Since I lost all my previous data there was no existing list of downloaded files and so the script would proceed to try and download everything in the feeds.  To stop this I added a ‘catchup’ mode which can be accessed using the ‘-c’ option.  In this mode the script wouldn’t actually download anything but would act as if it did (and so log that the files were already downloaded). After running the script in catchup mode once I edited each of the logfiles and removed the last one or two entries.  Then when I finally ran the script normally it started downloading those episodes.

And now I am finally returning to normal!

The script can be see at bashpodder.sh

Here is a sample .bashpodder

G’day

I’ve had this blog sitting here blank for a fair while now and so I figured it is about time I did something with it.

I work in Sun as a backline OS engineer and have a major interest in Linux along with Solaris.

I’ve recently got into electronics and am in the progress of making a Arduino controlled lighting box and also am designing my own little robot.

In this blog I’ll attempt to document the lighting box and whatever else I get around to making.

I also have a habit of writing lots of little scripts/fixes so I’ll post them here as well anything else that comes to mind

Here’s hoping I actually remember to do any of this 🙂